Synchronize Files
One-Way Sync
This is a common option so we have created a helper application to perform the correct operation on the target based on what happens in the source. The Sync Helper will try to recover if the target is not in sync and gracefully handle errors such as when something is deleted on the source and does not exist at the destination. File locking is honored and it will wait up to ten seconds for a lock to expire. All operations are logged to the Activity Log.
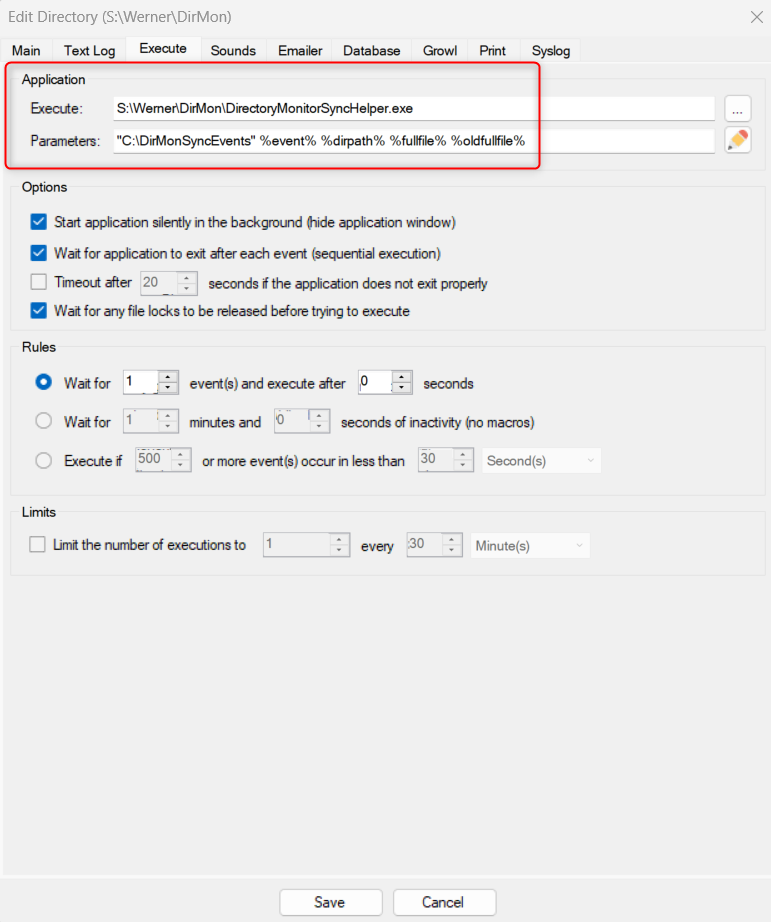
Download the latest Sync Helper and apply the following settings in the Execute tab for a directory you want to sync operations to a target.
Always the use the following Parameters when using the Sync Helper:
"C:\YOUR_SYNC_TARGET_DIRECTORY" %event% %dirpath% %fullfile% %oldfullfile%
WARNING: Do not use a trailing slash in your target directory path. \" is treated as an escaped character when used as a command-line parameter and you will get "exited with code 1" errors.
Two-Way Sync
robosync.bat
@echo offrem Parameters: %dirpath%rem Set this to the directory you want to sync all changes into.set syncpath=C:\Sync\DirMon\robocopy /MIR "%~1" "%syncpath%"exit
All you will need to change in this script is the location where you want to the changes to be synchronized. Set the
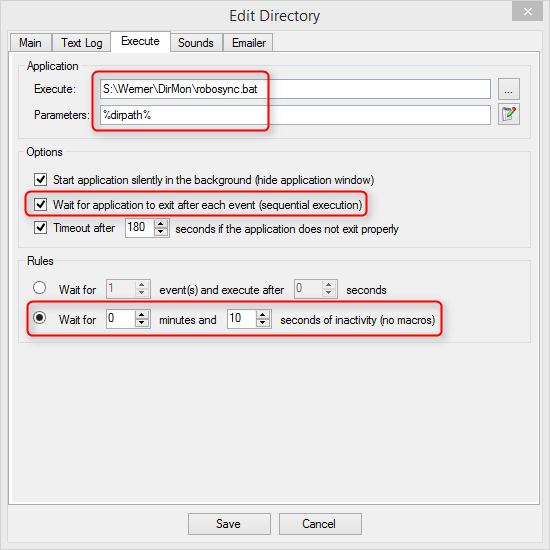
Next up, we need to configure Directory Monitor to call this batch file and set the options in an optimal way to synchronize often without causing conflicts when a lot of changes are happening. Edit or add a new directory to monitor, and go to the Execute tab.
NB: Be very careful with something like this, RoboCopy will happily delete files if they are deleted in the source. Make sure you use test folder thoroughly before taking an automation script like this to your live directories/shares.
syncpath variable appropriately and you're ready to go.Next up, we need to configure Directory Monitor to call this batch file and set the options in an optimal way to synchronize often without causing conflicts when a lot of changes are happening. Edit or add a new directory to monitor, and go to the Execute tab.
- Add the path to the batch file you created earlier to Execute.
- Optionally set the Parameters to
%dirpath%. - Ensure you set the option to execute sequentially, you don't want multiple RoboCopy instances trying to sync the same directory.
- It's a good idea to wait for some inactivity as well so that RoboCopy can batch the work it does rather than trying to sync for every tiny change. This is especially important if you expect the directory to be very busy at times.
- If you have the option to run things silently it would be a good idea to enable it since RoboCopy can take some time before the script window closes.
NB: Be very careful with something like this, RoboCopy will happily delete files if they are deleted in the source. Make sure you use test folder thoroughly before taking an automation script like this to your live directories/shares.