Custom Plugins (SDK)
You can glance over the interface documentation for the API here: http://directorymonitor.com/sdk/
Step 1: Install
Download and install the SDK.The SDK provides a Visual Studio project template to quickly get started creating a plugin for Directory Monitor. The SDK works with Visual Studio 2010 through to 2013 as well as the express versions.
Step 2: New Project
Start a new project using the Directory Monitor Plugin project template.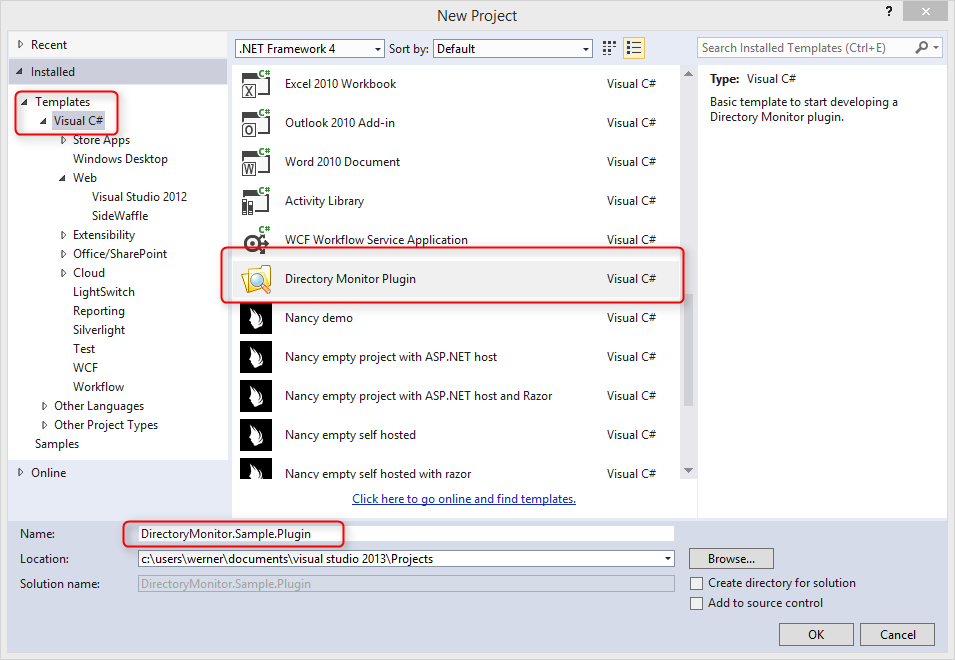
NB: Ensure the the word "Plugin" is present in the assembly name. Directory Monitor uses the *Plugin*.dll pattern to dynamically load plugins and avoid other non-plugin dependencies. For this sample, the output will be DirectoryMonitor.Sample.Plugin.dll which matches the required pattern.
Step 3: Plugin Template
Familiarize yourself with the different aspects of the plugin and remove the items that you will not need. Inline documentation will be available, you can also read the API documentation on http://directorymonitor.com/sdk/. The template contains boilerplate code for multi-threading safety, periodic reties of failures, queue processing and more. TODO comments are in place where you will need to fill in custom logic.You should rename the classes from "Template" to something more suitable for your project. The is no naming convention so you are free to call the classes anything you want.
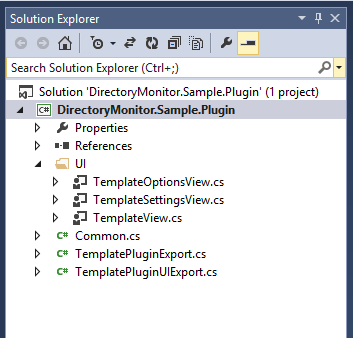
- TemplateOptionsView - This view is displayed in a tab when the user navigates to File -> Options. This view is used to configure global options for a plugin and usually used to provide configuration for the main TemplateView.
- TemplateSettingsView - This view is displayed in a tab per directory setting. When adding or editing a directory, this view will be available to configure aspects of your pluin on per directory basis.
- TemplateView - This is the view that appears on the main screen (along the Text Log, Grid Log and Activity Log views).
- TemplatePluginUIExport - This implements the required interface to expose your views to the application.
- TemplatePluginExport - This implements the required interface to handle events from the monitoring engine. This is where the heart of your plugin functionality will reside.
Step 4: Implement
The main method to implement is HandleEvent in TemplatePluginExport. This method take a MonitoringEventArgs object which contains all the information gathered by a Directory Monitor change event.Step 5: Build
Building the plugin will also copy it to C:\Program Files\DevEnterprise.NET\Directory Monitor 2\Plugins. This is also where the plugin and any external dependencies need to be deployed when you are complete.After removing or renaming any items, ensure the build still works then we can move onto implementing features.
Step 6: Debugging
During development of your plugin it is important to know how to attach to the Directory Monitor process and break into your code.Navigate to the project properties and configure your project to execute and attach to Directory Monitor (C:\Program Files\DevEnterprise.NET\Directory Monitor 2\DirectoryMonitor.exe) automatically.
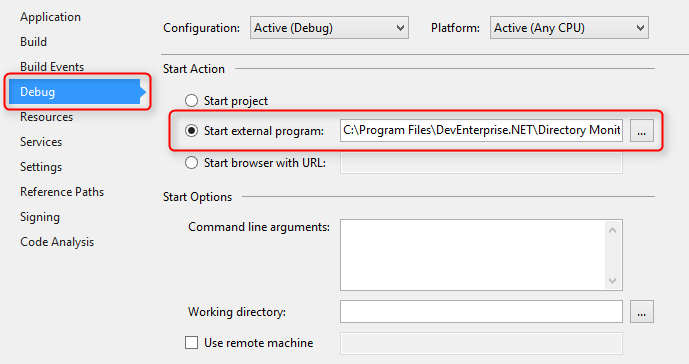
http://www.deventerprise.net/images/directorymonitor/support_sdk_debug.pngIf you already have an instance of Directory Monitor open, you can attach to the process directly by using Debug -> Attach to Process. Select DirectoryMonitor.exe (or the service or console if you wish) and attach. You should be able to generate and even and hit any of your selected break points.